
I am a computer enthusiast and software aficionado, amongst a myriad of applications, the Snipping Tool clearly stands out as my favorite. Its utility, ease of use, and versatility are simply unparalleled. As we delve deeper into why I hold such a high regard for this application, it would also be important to understand how you can install Snipping Tool on Windows to reap its benefits firsthand.
Getting the Snipping Tool: The Installation Process
What further adds to the accessibility is how effortlessly you can install Snipping Tool for free. There is no need to invest a dime, which makes it light on the pocket but heavy on features. Here is a simple step-by-step guide to acquire it:
- You need to access the 'Control Panel' on your Windows operating system.
- There, look for 'Programs and Features' and click on it.
- On the left side, you will find 'Turn Windows features on or off' - click on it.
- A pop-up box will show up with all the features you can turn on or off. Scroll until you see ‘Tablet PC Components’.
- Check that box and hit 'OK'. After a few moments, Windows will apply these changes and the Snipping Tool will be installed.
Why You Should Install Snipping Tool: Features Galore
Now that we have discussed the steps to install Snipping Tool app, let's explore why this has turned out to be my all-time favorite application. A sincere appreciation for Snipping Tool allows you to execute quick and easy screenshot tasks, providing a wealth of options:
- Full-screen Snip: This captures the entire screen, much like the traditional print screen function.
- Window Snip: This takes a screenshot of an active window, handy when you are running multiple applications.
- Rectangular Snip: Here, you are given the freedom to select a particular area you want to capture.
- Free-form Snip: Unleashing your inner artist, this feature lets you draw irregular shapes to capture whatever you want!
The User-Friendly Interface: Demystifying Snipping Tool
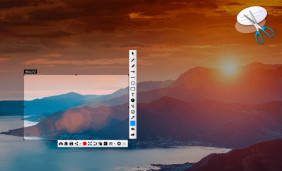
In case you are worried about how to navigate through the said functionalities, please rest assured. The user-friendly interface of Snipping Tool puts a premium on simplicity and intuitiveness. Once you execute the Snipping Tool download and install process, the real fun begins. The toolbar consists of a ‘New’ button to create a new snip, a ‘Cancel’ button in case you want to abort, and an ‘Options’ button providing plenty of room for customization.
Experience Unmatched Versatility: Appreciating the Snipping Tool
The Snipping Tool is more than just a mundane screenshot utility, in fact, it's a testament to versatility. Once you snag a screenshot, you will notice a window pop up offering numerous options. Here, you can save the image in multiple formats, copy to the clipboard, and even email directly using the application. This further enhances the appeal of investing your time to install Snipping Tool. The added bonus is the in-built option to annotate your screenshots using various colors, highlighting important information you might want to return back to.


 A Comprehensive Guide to Snipping Tool: How to Install the App
 Dive into World of Handy Screenshots With Snipping Tool
 Snipping Tool - A Digital Companion for Screenshots on Chromebook
 Unveiling the Unparalleled Benefits of Snipping Tool